Zombie Lair Guide — Recommended Might, Lv.1–60 Rewards & How to Join Rallies
Attacking Zombie Lairs on the World Map in Rallies with your Alliance members yields essential progression rewards:
- Antiserum needed to level up your heroes
- Supply Boxes containing Hero Choice cards, Nova Economy Pts, Gear enhance materials, and more
- Random / Bonus Drops:
- Gear Promoters
- Weapon Promoter I (Lv.41+) and Weapon Promoter II (Lv.51+)
- Rare 5★ Hero Fragments: Hanyu Ichiro, Dara, and Angelo (Lv.43+)
Core Rally Strategy
Section titled “Core Rally Strategy”Stamina regenerates naturally up to a cap of 120 and stops accumulating once full, so rally Zombie Lairs regularly before hitting 120.
In most Alliances, a Rally Leader starts a Rally on a Zombie Lair level they can defeat solo, and participants ride along for the rewards.
As a general rule, participants should join using as many T1 Vehicles (Taxis) as possible.
(If your Taxis are busy gathering resources and you only have a few available, there is no need to hold back—just send what you have.)
Lair Level Benchmarks and Rewards
Section titled “Lair Level Benchmarks and Rewards”If you are unsure which Zombie Lair level your account can clear or when to step up to the next tier, use the benchmarks below.
Victory Rule (50% Elimination) & When to Move Up
Section titled “Victory Rule (50% Elimination) & When to Move Up”You do not need to wipe out 100% of a Zombie Lair to win—eliminating 50% or more of the enemy troops counts as a victory.
To test the highest level you can solo-lead, ask an Alliance member to join with 1 T1 Taxi (or a small Taxi march) and inspect the Damage/Elimination % in your Battle Report.
(If you score under 50% and lose, 100% of your Stamina is refunded, and on Lv.40 and below you incur zero Infirmary wounded—making test runs risk-free.)
- Standard Step-Up Benchmark (60%–65%+ Elimination)
When the next Lair level uses the same enemy troop tier, clearing your current level with 60%–65%+ elimination gives you a strong chance of crossing 50% on the next level up. - Tier-Jump Milestone Benchmark (70%–75%+ Elimination)
Difficulty jumps sharply whenever enemy troop tiers step up—specifically at Lv.30 (T8), Lv.32 (T9), Lv.34 (T10), Lv.39 (T11), Lv.44 (T12), Lv.53 (T13), and Lv.59 (T14). Before pushing into one of these milestone levels, aim for 70%–75%+ on the level right before it (Lv.29, Lv.31, Lv.33, Lv.38, Lv.43, Lv.52, Lv.58).
Enemy Tiers, Troop Counts & Recommended Leader Tiers (Lv.1–60)
Section titled “Enemy Tiers, Troop Counts & Recommended Leader Tiers (Lv.1–60)”Assuming the Rally Leader deals 100% of the damage solo, every Zombie Lair fields an even 25% split across all 4 troop types (Fighter, Shooter, Rider, and Vehicle).
(Note: Recommended troop tiers below are general guidelines; exact results depend on your Troop Size and specialized buffs from Heroes, Gear, Chips, Modules, Cubes, Bioenhancers, and Nanoweapons.)
| Lair Level | Enemy Tier | Total Enemy Troops (Even 4-Type Split) | Recommended Leader Tier | Key Reward & Mechanic Changes |
|---|---|---|---|---|
| Lv.1 – 7 | T1 | 12 – 5,040 | T1 – T3 (Very Early Game) | Stamina Cost 20 / Antiserum 5,000 – 12,000 |
| Lv.8 – 10 | T2 | 8,000 – 20,000 | T3 – T4 (Up to ~HQ 15) | Lv.8+: Stamina Cost 25, 1★ Enhance Materials added Lv.10+: 3★ & 4★ Hero Choice added |
| Lv.11 – 13 | T3 | 26,000 – 40,000 | T4 – T5 (~HQ 15 – HQ 16) | Lv.13+: Requiem fragments start dropping |
| Lv.14 – 17 | T4 | 56,000 – 120,000 | T5 – T6 (~HQ 16 – HQ 19) | Lv.15+: Stamina Cost 30 |
| Lv.18 – 21 | T5 | 140,000 – 240,000 | T6 – T7 (~HQ 19 – HQ 22) | Lv.20+: 5★ Hero Choice added at low probability |
| Lv.22 – 25 | T6 | 264,000 – 336,000 | T7 – T8 (~HQ 22 – HQ 25) | Lv.22+: Stamina Cost 35 |
| Lv.26 – 29 | T7 | 360,000 – 432,000 | T8 – T9 (~HQ 25 – HQ 28) | Lv.29+: Stamina Cost 40 (Max) |
| Lv.30 – 31 | T8 | 480,000 – 528,000 | Late T8 – T9 (Start Specializing) | Focus on 1 troop specialization (Fighter / Rider / Shooter) |
| Lv.32 – 33 | T9 | 576,000 – 624,000 | T9 – Early T10 (HQ 28 – HQ 30) | Unlock Rider / Shooter Formation research for higher damage |
| Lv.34 – 38 | T10 | 672,000 – 1,080,000 | Late T9 – T10 (HQ 30 – HQ 33) | Lv.34+: Enemies become T10 (1.08M troops at Lv.38) |
| Lv.39 – 40 | T11 | 1,200,000 – 1,320,000 | T10 (HQ 33 – HQ 34 + Buffs) | Lv.39+: Enemies become T11 Up to Lv.40: 100% auto-recovery (zero healing cost) |
| Lv.41 – 43 | T11 | 1,440,000 – 1,800,000 | Late T10 – T11 (~HQ 35) | Lv.41+: Real wounded occur; Weapon Promoter I (3–5) Lv.43+: Rare Hero Frags (Hanyu Ichiro / Dara / Angelo) added |
| Lv.44 – 52 | T12 | 2,000,000 – 2,400,000 | T11 – T12 (HQ 35 – HQ 39) | Lv.44+: Enemies become T12 / Lv.45–52: Troop count fixed at 2.4M (enemy Might scales) Lv.45+: 7× Weapon Promoter I fixed / Lv.51+: Weapon Promoter II added |
| Lv.53 – 58 | T13 | 2,400,000 – 3,600,000 | T12 – T13 (~HQ 40+ High Buffs) | Lv.53+: Enemies become T13 (scales from 2.8M at Lv.56 to 3.6M) |
| Lv.59 – 60 | T14 | 3,600,000 – 4,000,000 | T13 (Endgame Tier) | Lv.59+: Enemies become T14 (Lv.60 = 1M per type / 4M total) Rare Hero Frag drop rate reaches 13.50% |
- Enemy Composition & Type Matchups: Every Zombie Lair fields 25% Fighter, 25% Shooter, 25% Rider, and 25% Vehicle. When you attack with a single specialized troop type (Fighter, Shooter, or Rider), you deal 1.5× damage to the weak counter type (25%) and Vehicles (25%), 1.0× to your mirror type (25%), and 0.7× to your hard counter (25%)—making all three troop specializations equally viable.
- Why Lv.45–52 Still Gets Harder: Between Lv.45 and Lv.52, total enemy troop count stays constant at 2,400,000 (600,000 per troop type), while displayed enemy Might rises steadily from 1.8B to 6.0B. You will still need stronger buffs for each step up.
Key High-Level Drops (Weapon Promoters & Rare Hero Frags)
Section titled “Key High-Level Drops (Weapon Promoters & Rare Hero Frags)”Starting at Lv.41, rallies begin generating actual wounded troops in your Infirmary, but they also unlock critical endgame rewards for Nanoweapons and rare 5★ heroes.
1. Weapon Promoter Drops (Lv.41+)
Section titled “1. Weapon Promoter Drops (Lv.41+)”- Weapon Promoter I:
- Lv.41: 3 / Lv.42: 4 / Lv.43: 5 / Lv.44: 6
- Lv.45+: 7 (fixed)
- Weapon Promoter II:
- Begins dropping at random starting from Lv.51+.
2. Rare Hero Fragment Drop Rate (Lv.43+)
Section titled “2. Rare Hero Fragment Drop Rate (Lv.43+)”Clearing Lv.43+ Zombie Lairs gives a chance to drop a fragment of Hanyu Ichiro, Dara, or Angelo.
The drop rate starts at 0.75% at Lv.43 and increases by +0.75% per Lair level:
| Lair Level | Frag Drop Rate | Lair Level | Frag Drop Rate | Lair Level | Frag Drop Rate |
|---|---|---|---|---|---|
| Lv.43 | 0.75% | Lv.49 | 5.25% | Lv.55 | 9.75% |
| Lv.44 | 1.50% | Lv.50 | 6.00% | Lv.56 | 10.50% |
| Lv.45 | 2.25% | Lv.51 | 6.75% | Lv.57 | 11.25% |
| Lv.46 | 3.00% | Lv.52 | 7.50% | Lv.58 | 12.00% |
| Lv.47 | 3.75% | Lv.53 | 8.25% | Lv.59 | 12.75% |
| Lv.48 | 4.50% | Lv.54 | 9.00% | Lv.60 | 13.50% |
Joining Zombie Lair Rallies — Basics
Section titled “Joining Zombie Lair Rallies — Basics”As noted above, join rallies using as many T1 Vehicles (Taxis) as possible.
Saving a dedicated Taxi preset lets you join fast before rallies fill up.
Because joiners’ hero buffs only apply to their own troops, you do not need to include any heroes when sending Taxis.
Here is why the T1 Taxi method works so well:
Why Not Join With a Full Main March?
Section titled “Why Not Join With a Full Main March?”When a Rally Leader picks a Lair they can beat alone, sending random extra combat troops often increases total casualties unnecessarily—which can leave you or your Rally Leader with days of Infirmary healing on Lv.41+ Lairs.
Why Use Vehicles?
Section titled “Why Use Vehicles?”As mentioned in the in-game Radio Station Quiz, Vehicles are always the last troop type to take casualties.
In the default Fighter Formation, troops absorb damage in this order:
Fighter > Rider > Shooter > Vehicle
Because Vehicles never take combat casualties until all front-row troop types are wiped out, sending Vehicles keeps total rally wounded to a minimum.
Conversely, sending low-tier Fighters puts fragile troops at the very front of the fight—multiplying total wounded across the rally and shifting extra casualties onto the Rally Leader’s high-tier troops.
Why T1 Taxis?
Section titled “Why T1 Taxis?”T1 Vehicles are dirt cheap to train and heal.
Healing 1 T1 Taxi costs only 8 Food, which is effortlessly covered by the Food rewards from the Lair itself.
Taxis are also super useful elsewhere (gathering, Infirmary filling in WK, etc.), so keeping a large pool of T1 Taxis is always worthwhile.
Why Send “As Many Taxis as Possible”?
Section titled “Why Send “As Many Taxis as Possible”?”After a rally battle ends, the game distributes total wounded proportionally across every participant’s troop count—not strictly onto whichever player’s troops took the initial hits.
For example, suppose a Rally Leader sends 200,000 Riders, a joiner sends 200,000 Taxis, and 2,000 casualties occur in combat:
Even though the combat order targeted Riders, the post-battle split assigns 1,000 wounded to the Leader’s Riders and 1,000 wounded to the joiner’s Taxis.
Rescued by Nova then reduces actual Infirmary casualties to 1/10th (or 0 on Lv.40 and below).
Since healing T1 Taxis is far cheaper than healing high-tier combat troops, sending a large Taxi march splits the Rally Leader’s healing burden in half for pennies—a true win-win!
Example of a Zombie Lair rally battle report:

Stamina Management
Section titled “Stamina Management”Attacking solo Zombies or rallying Zombie Lairs consumes Stamina.
Stamina Cost
Section titled “Stamina Cost”Each Lair level has a fixed base Stamina cost.
Currently, McCarty’s military skill is the only hero skill that reduces Lair Stamina cost:
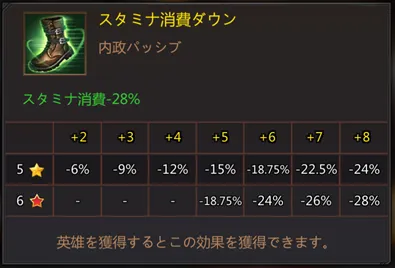
| Lair Level | Base Cost | McCarty ★5 +2 | ★5 +4 | ★6 +6 | ★6 +8 |
|---|---|---|---|---|---|
| 1 – 7 | 20 | 18 | 17 | 15 | 14 |
| 8 – 14 | 25 | 23 | 22 | 19 | 18 |
| 15 – 21 / Event Lv.5 & below | 30 | 28 | 26 | 22 | 21 |
| 22 – 28 | 35 | 32 | 30 | 26 | 25 |
| 29+ | 40 | 37 | 35 | 30 | 28 |
| Event Lv.6+ | 60 | 56 | 52 | 45 | 43 |
Recovering Stamina
Section titled “Recovering Stamina”You can recover Stamina in three ways:
-
Natural Recovery
By default, Stamina regenerates at 1 point every 6 minutes.
Two buffs can speed this up to 1 point every 4 minutes:- Research Center > Development > Stamina Recovery I & II (+25% recovery speed)
- Balance Talent > Stamina Recovery I & II (+25% recovery speed)
- Economy Talent:
117 Staminatakes 9h 16m
- Balance Talent:
116 Staminatakes 7h 43m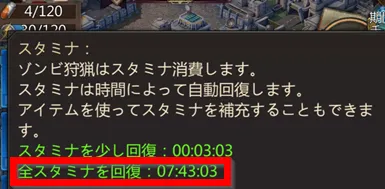
Free Talent switching requires VIP 10 or higher.

- Economy Talent:
-
Daily Quest Point Chests
Claiming the30 pt,60 pt, and90 ptchests directly restores +10 Stamina each immediately.
(These restore Stamina directly rather than giving Bag items.) -
Stamina Recovery Items (Stamina Capsules / Energy Drinks)
These cannot be bought with Diamonds in normal shops and are very valuable—save them for major Skin or holiday events where Stamina translates directly into top rewards.
Stamina Saving Rally (Overcapping Past 120)
Section titled “Stamina Saving Rally (Overcapping Past 120)”Normal Stamina caps at 120.
Because Stamina is only consumed if a Zombie Lair rally wins—and refunded in full if it loses—you can temporarily bank Stamina above 120 using a Stamina Saving Rally:
-
Start a 1-hour Rally with 1 troop against a high-level Zombie Lair you are guaranteed to lose against.
Example:120 → 92 Stamina(using a28-Stamina Lair). -
Cancel the rally after 1 hour or let the 1-troop march hit and lose.
Example: Natural recovery over 1 hour brings you from92 → 107 Stamina(at 1 Stamina / 4 min). -
When the 1-troop rally returns, the refunded Stamina pushes you past the 120 cap.
Example:107 → 135 Stamina.
Hunt Focus Skill
Section titled “Hunt Focus Skill”Using the Hunt Focus Commander Skill reduces Zombie Lair Stamina costs by 20% for 10 minutes.
If you only launch your own 5-minute rallies, you will only benefit twice—but if your Alliance coordinates and launches rallies together, you can launch 1 rally of your own while joining 4 others, capturing up to 10 discounted rallies (2 waves × 5 march slots) in a single 10-minute window!
Activate Hunt Focus via Book icon (bottom-right) > Commander Skills > Hunt Focus (unlocked as the 3rd node in the Balance Talent tree):

Stamina Cost with Hunt Focus Active:
| Lair Level | Base Cost | McCarty ★5 +2 | ★5 +4 | ★6 +6 | ★6 +8 |
|---|---|---|---|---|---|
| 1 – 7 | 20 | 14 | 13 | 11 | 10 |
| 8 – 14 | 25 | 18 | 17 | 14 | 13 |
| 15 – 21 / Event Lv.5 & below | 30 | 22 | 20 | 16 | 15 |
| 22 – 28 | 35 | 25 | 23 | 19 | 18 |
| 29+ | 40 | 29 | 27 | 22 | 20 |
| Event Lv.6+ | 60 | 44 | 40 | 33 | 31 |
Advanced Multi-March Rally Setups
Section titled “Advanced Multi-March Rally Setups”While single-carry Taxi rallies are standard, understanding combat targeting allows multiple strong players to combine DPS marches and clear much higher Lair levels without spiking casualties.
In battle:
- Attacking: All troops in the rally attack the enemy’s frontmost surviving unit simultaneously.
- Defending: Casualties hit the lowest-tier troops of the frontmost troop type in the Rally Leader’s formation first, moving down the line only after that unit is wiped out.
Formation order by research:
- Fighter Formation (Default):
Fighter > Rider > Shooter > Vehicle - Rider Formation:
Rider > Shooter > Fighter > Vehicle - Shooter Formation:
Shooter > Fighter > Rider > Vehicle
In the default Fighter Formation, casualties occur strictly in this order:
Low-Tier Fighter > High-Tier Fighter > Low-Tier Rider > High-Tier Rider > Low-Tier Shooter > High-Tier Shooter > Low-Tier Vehicle > High-Tier Vehicle
Therefore, if joiners send strong troops belonging to a troop type that sits behind the Rally Leader’s main troop type, those joiners add huge firepower while absorbing zero extra frontline losses:
| Leader Formation | Rally Leader Troop Type | Safe Joiner Troop Type(s) |
|---|---|---|
| Fighter | Fighter | Rider / Shooter |
| Fighter | Rider | Shooter |
| Fighter | Shooter | (None—use Vehicles) |
| Rider | Rider | Fighter / Shooter |
| Shooter | Shooter | Fighter / Rider |
When running multi-march DPS rallies, joiners should also bring their combat heroes:
| Effect | Whose Heroes Apply? |
|---|---|
| Troop Stat Buffs | Each participant’s own heroes |
| Tactical Special | Rally Leader’s heroes |
For best results, the Rally Leader should run 4 heroes matching their own specialized troop type plus 1 hero matching the joiner’s troop type to maximize Tactical Special synergy.